To create a new Form, click App Builder > Screens to view your existing screens.
Next select Data Entry Form as the screen type. Give the new Form a name and select an icon for it from the drop down list. The icon will appear next to the form on the users’ mobile devices. This makes navigating your app easier.
For simple forms, this is all you need to do, so click the Create button.
For now, we don’t need a Data Source.

You will now see the Form Designer.

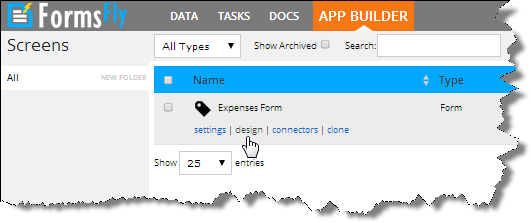
If you need to get back here to modify an existing Form, you can use App Builder > Screens again and the roll over the form you want, then click Design.
The Form Designer Screen
Forms are made up of “questions” which will be displayed to your form users. The answers to those questions could be all sorts of things, as we’ll see below.
The Form Designer screen provides a visual view of the questions in your Form and gives you a drag and drop approach to creating and modifying your Form design.
Along the top of the Designer you will see a row of Question Type icons – you can mouse over each one to see a brief description.
The question types available are as follows:
| Text The simplest question type that allows capture of any text value. You can specify a desired format to force entry of values like email and web addresses, as well as phone numbers. |
| Numeric For capture of number values. You can restrict to either integer or decimal values as well as the range of values permitted. |
| Date/Time Allows capture of date and/or time values. |
| Choices Allows you to specify a list of choices for the user to answer from. You can specify whether a Choices question permits only one answer or multiple answers. Choices questions can also use Data Sources for their options – Data Sources are a powerful feature that allows you to maintain answer lists centrally and share these lists between multiple Forms. Have a look at the Data Sources page help for more details. |
| Location Allows the app user to capture a geographic location using their device GPS or by picking a point on a map. |
| Media For capture of photos, video and audio using the app user’s device. Any media captured is uploaded as part of the Form entry. |
| Barcode Allows the capture of common barcode formats and QR codes using the device camera. The answer value returned is the barcode contents – e.g. the product number found in the barcode. |
![]()
DrawingProvides the ability to capture drawings on the device touch screen. This is useful for capturing signatures as well as sketching simple diagrams.ChecklistAllows the creation of checklists – i.e. a set of questions that have a common set of answer options. You can specify whether only one answer or multiple answers per question is acceptable. When creating checklists, you should be mindful of the device screen size.Try to keep your option labels very short and use a maximum of 4 answer options if your app users have smart phones. Tablet devices have bigger screens, so you could have more answer options if your app users have tablets.GeolistLets you define a set of Location questions which will be laid out in a list form like a Checklist. The Geolist allows the user to answer all location questions on a single map display, making for a simpler and faster way to capture multiple Locations at once.![]()
![]()
Page / Group
This is a common type that you should use whenever you want to repeat questions or show multiple questions on the same screen.Form Task
This powerful question type allows you to create Forms that move between multiple app users – useful for processes like approvals or sign offs. Form Tasks create a “cut off” that will stops the Form wherever the Form Task appears and prompts the app user to choose someone else to send the Form onto. The Form entry is saved at that point and then sent as a Task to the selected person. So you could have say an order Form which uses a Form Task to handle an approval process – the first app user creates the Form entry and fills out the order details. Then a Form Task sends the entry onto a supervisor for Approval as a Task.To create your Form, drag and drop the question types you desire onto the white work area.You can move questions around to change the order, and drag questions in and out of Page Groups as you wish.
When you click on a question in the work area, you will notice that a Properties bar appears on the right hand side of the screen.The Properties bar is where you specify the details and function of each question.Every question must have a unique Name which is the column heading you will see in the Data tab, as well in data exports you may perform. Data Names cannot have spaces or special characters.
Display Text is the question text that will display on the Form to the app user.The Hint property lets you specify additional text to explain the question to the app user.Most questions have Read Only and Required options, which enable you to prevent data entry and require an answer respectively.The Read Only option is generally useful when you want to show a message or fixed answer to the app user.Most question types also have an Advanced section which lets you specify a default value, control question visibility, validate answers and redirect answers to another question. Advanced properties require you to define a special formula that is similar to an Excel formula in nature. You can find details of how to create a formula by clicking the HELP button found in the Advanced section.Once you created your Form design, make sure you click the “save changes” link in the options bar to save the contents.![]()
After saving your changes, you can use the “edit details” link in the options bar to go on and Publish the Form.![]()